Let’s start with pros and cons of Android Studio (based on my viewpoint):
PROS:
– Better UI in designing and coding
– ProGuard and app-signing capabilities.
– Gradle-based build support (For you that has already get used to it)
CONS:
– Hard to manage multiple projects. (For example: to delete a project you have to delete from the explorer)
– Gradle-based build support (For you that’s not get used to it)
– Still in EAP (Early Access Preview)
If you have something to say about PROS-&-CONS, I’m glad to hear from you.
Let’s get started!
Installing Android Studio
First of all, go to http://developer.android.com/sdk/installing/studio.html and download the installer.

Windows:
– Launch the downloaded EXE file, android-studio-bundle-<version>.exe.
– Follow the setup wizard to install Android Studio.
– Known issue: On some Windows systems, the launcher script does not find where Java is installed. If you encounter this problem, you need to set an environment variable indicating the correct location. Select Start menu > Computer > System Properties > Advanced System Properties. Then open Advanced tab > Environment Variables and add a new system variable JAVA_HOME that points to your JDK folder, for example C:\Program Files\Java\jdk1.7.0_21.
Mac OS X:
– Open the downloaded DMG file, android-studio-bundle-<version>.dmg.
– Drag and drop Android Studio into the Applications folder.
– Known issue: Depending on your security settings, when you attempt to open Android Studio, you might see a warning that says the package is damaged and should be moved to the trash. If this happens, go to System Preferences > Security & Privacy and under Allow applications downloaded from, select Anywhere. Then open Android Studio again.
Linux:
– Unpack the downloaded Tar file, android-studio-bundle-<version>.tgz, into an appropriate location for your applications.
– To launch Android Studio, navigate to the android-studio/bin/ directory in a terminal and execute studio.sh.
– You may want to add android-studio/bin/ to your PATH environmental variable so that you can start Android Studio from any directory.
After you installed Android Studio, let your journey begin. But first, you must remember that Android Studio is still in EAP, so there will be many bugs/glitches/errors/whatever-you-call-it that can be annoying. But if you patient enough, you will find it very fun.
How to create project?
It’s easy! Just use File -> New Project…
Or, if it’s your first time using Android Studio, you will be welcomed with options to “Create New project”

Exploring your projects
File system is quite different with Eclipse. Considering that your android apps will be Gradle-based. So you just have to modify everything inside main project folder (See picture, file under “DMap” is main project folder). Unless you’re an expert in Gradle and Intellij.

After you get used to the UI and layout, you can start coding & designing your app.
Designing Layout using Android Studio is Better?
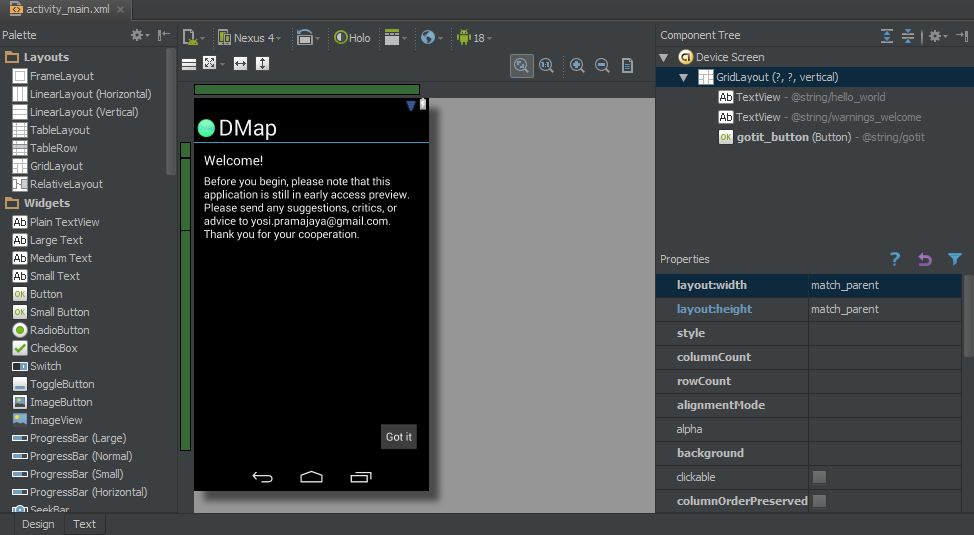
Yes! You can see pictures below that you have 2 options to design layout. First by typing it directly through “Text” mode, or “Drag-and-drop” design. Both of them enable you to preview your design. Just have a 15-minutes experiments with your preview, and you will feel the power!
Let me give you some examples:
Design with “Text” mode

Design with “Drag and Drop” mode
How to include support library?
Another great thing that announced in Google I/O 2013 is ActionBar Compat. I’m waiting it for a long time, because using “Sherlock ActionBar” is a little bit complicated. And now it’s released. Download it with your SDK Manager.
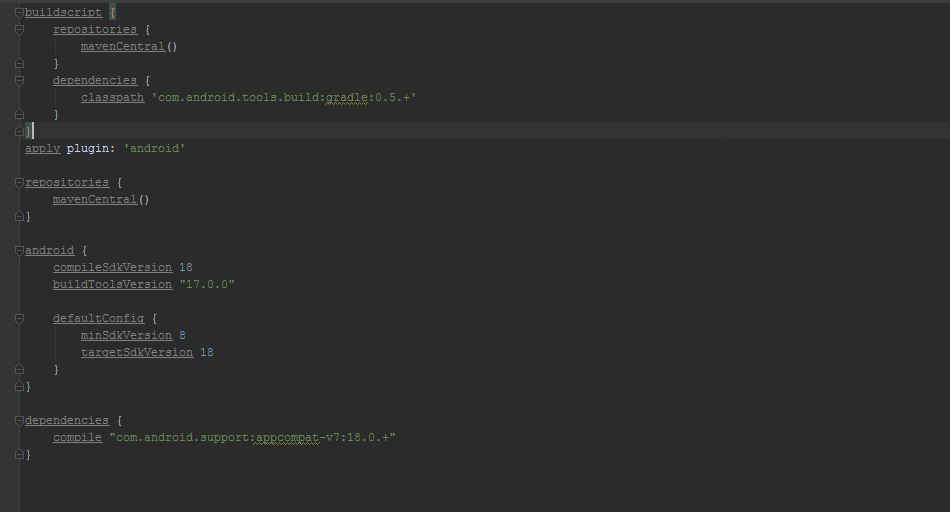
Then include it in your project. How? Because this is Gradle-based, it’s quite simple. Open “build.gradle” in your main project folder.
For Android-Support v4:
– It’s automatically included when you created new project. But if not, use second step.
– Add this line:
dependencies {
…
compile “com.android.support:support-v4:18.0.+”
}

For Android-Support v7:
– Add this line:
dependencies {
…
compile “com.android.support:appcompat-v7:18.0.+”
}
How tot test your app?
Just like Eclipse, Android Studio support 2 way of testing. By using AVD (Android Virtual Devices) or by real devices. To edit configurations, go to “Run” -> “Edit Configurations”. I recommend you to choose “Target Device” -> “Show chooser dialog”, to give you more freedom in testing.

For AVD:
– You have to create at least one AVD. To create AVD, go to “Tools” -> “Android” -> “AVD Manager”
– In the chooser dialog, select AVD, and choose your devices.
For Real Device:
– You have to enable USB Debugging in your devices! Enable it, then go forward.
– Connect it through USB. In chooser dialog, you will see your device there.
Known issue: Sometimes the driver is not right. You should use Google USB Driver for testing app in Android. Or sometime, your device won’t be detected if it’s in sleep/locked mode.
How to generate a signed APK?
This is also easy! Android Studio is provided with App-signing capability so you don’t have to open up your keytool or do somewhat-complicated task.
Here’s some steps:
– Go to “Build” -> “Generate Signed APK…”
– Click “Create new…”

– To make a new keystore, just put a non-exist keystore in “Key store path:” (The folder MUST exist, while the file MUST NOT exist). And other details.

– It will automatically completed our last dialog in keystore. Just click “Next”

– And “Finish”

No comments:
Post a Comment